Configuring subscriptions
This section describes how to configure Webhooks, GCP Pub/Sub, and AWS SQS individually.
Logical process flow
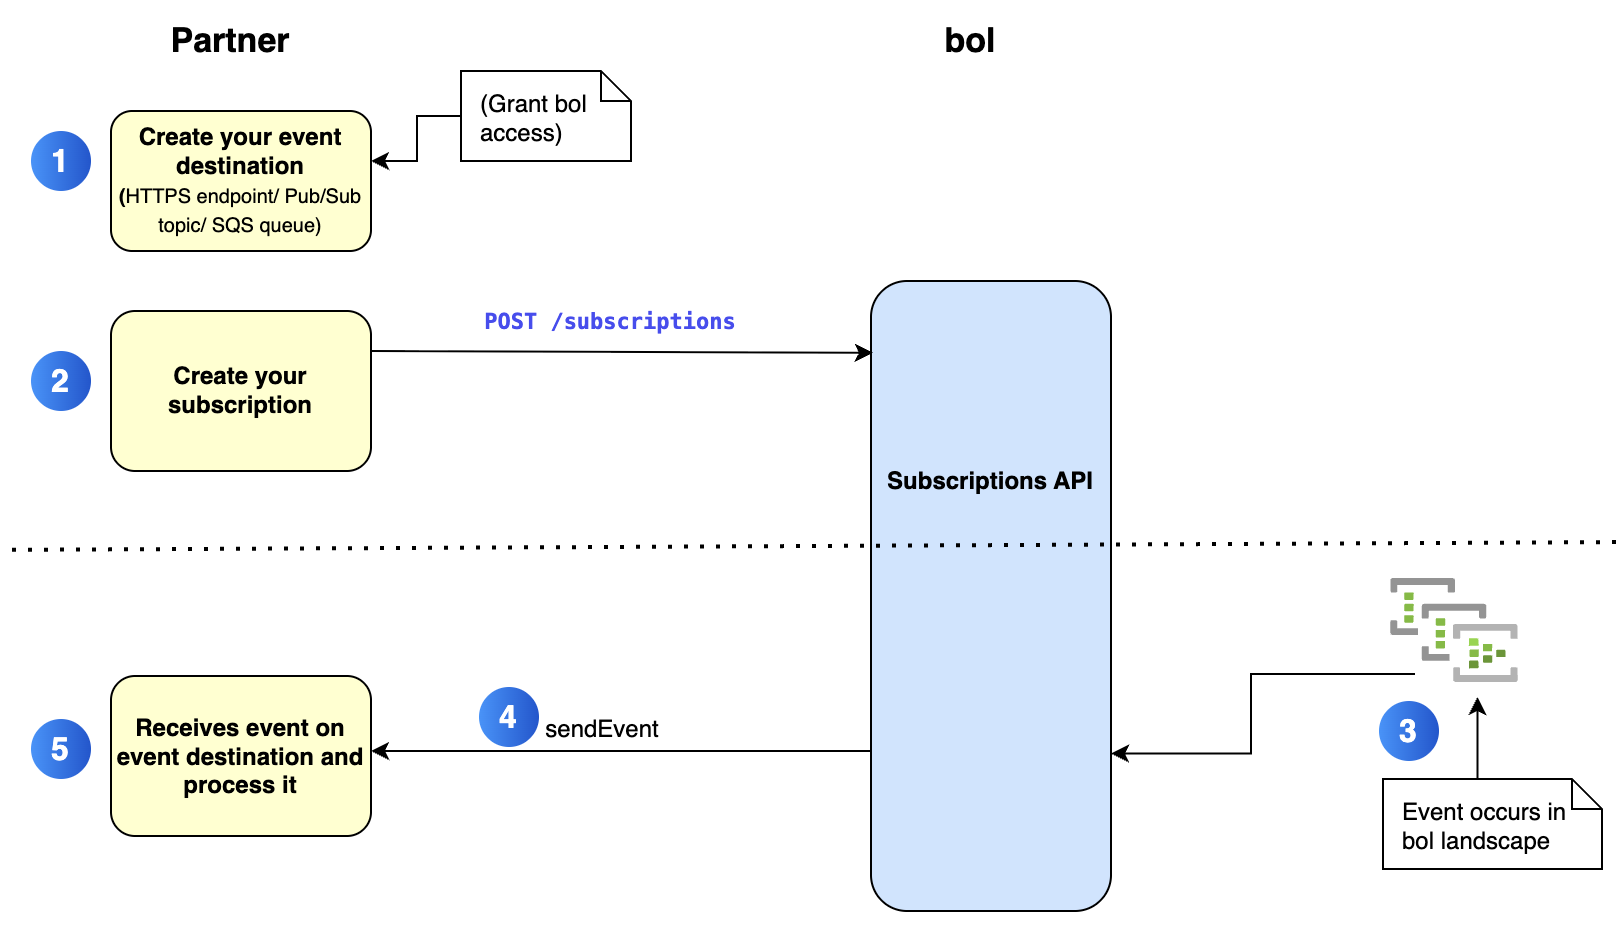
The following diagram describes the logical flow of subscribing to and receiving events:
Webhooks
Requirements
For security purposes, only webhooks registered on the https domain are accepted.
| Attempting to register a webhook without using SSL is not possible and will result in an error during the subscription process. |
Configuring Webhooks
Follow the steps below to connect to the subscriptions:
1. Creating the webhook
Create a webhook using an https address that can effectively receive the events you wish to subscribe to.
Ensure that your constructed endpoint can handle and process the incoming events effectively. For more information on the supported events, see Receiving events.
2. Subscribing to events
After successfully implementing your webhook, subscribe your endpoint to the Subscription API.
For more information on how to create a subscription, see the Create push notification subscription endpoint.
Alternatively, you could also choose to update your current subscription using the Update push notification subscription endpoint.
3. Receiving events
Once you have created your endpoint and subscribed to an event, you will start receiving messages.
The shipment events will notify you whenever there is an update to a transport event.
| There is a possibility of messages arriving in the incorrect order or experiencing non-delivery due to timeouts or other issues on either side. For more information, see here. |
GCP Pub/Sub
Requirements
To use Pub/Sub, a GCP (Google Cloud Platform) account is required. Additionally, the following prerequisites are necessary:
-
A Pub/Sub topic (or topics) that can receive messages from sources outside your Virtual Private Cloud (VPC).
-
Appropriate permissions to grant access to this topic (or topics).
Configuring GCP Pub/Sub
Follow these steps to start receiving event notifications on your Pub/Sub topic:
-
Create a standard Google Cloud Platform (GCP) Pub/Sub topic. To illustrate the process, henceforth, this topic is referred as
my-topic. -
On the
my-topicPub/Sub topic, grant theroles/pubsub.publisherpermission to thepusher-service-account@bolcom-pro-pusher-69b.iam.gserviceaccount.comservice account. -
Create a subscription using the Create push notification subscription endpoint and perform the following:
-
Set the value of the
subscriptionTypefield asGCP_PUBSUB. -
Use the fully qualified name of your topic as the
eventDestination. For example,projects/my-gcp-project-123/topics/my-topic.
-
-
Once done, the notifications will start arriving within an approximate period of 15 minutes.
For more information on the subscription types, see Supported event types.
NOTE:
-
All messages delivered via Pub/Sub include a
SignatureandUser-Agentmessage attribute, just like webhooks. You can verify the signature in exactly the same way. For more information, see Request signing. -
As Pub/Sub offers at-least-once delivery, it is essential to account for this in your application’s design and implementation.
-
After creating or deleting an offer, it may take a few minutes before notifications start or stop arriving.
AWS SQS
Requirements
To use AWS SQS, an AWS account is needed. Additionally, the following permissions are necessary:
-
Permissions to
-
create a new role,
-
create an identity provider (IdP),
-
create an SQS queue that can receive messages from sources outside of your VPC perimeter (this queue must reside in one of the EU regions -
eu-central-1,eu-central-2,eu-west-1,eu-west-2,eu-west-3,eu-north-1,eu-south-1oreu-south-2.), and -
allow a role to publish to the SQS queue.
-
Configuring AWS SQS for use with Bol notifications
| We highly recommend creating a role with either an inline policy or a purpose-built policy that restricts this role to only being able to publish to dedicated "Bol-specific" SQS queues. Do not grant this role access to any other resources, as Bol cannot be held responsible for potential misuse of this role. |
In order for Bol to be able to publish to your AWS SQS topic(s), you need to configure a trust relationship between your AWS IAM Role and the Bol GCP Service Account we use to publish these events. At a high level, the architecture looks like this:
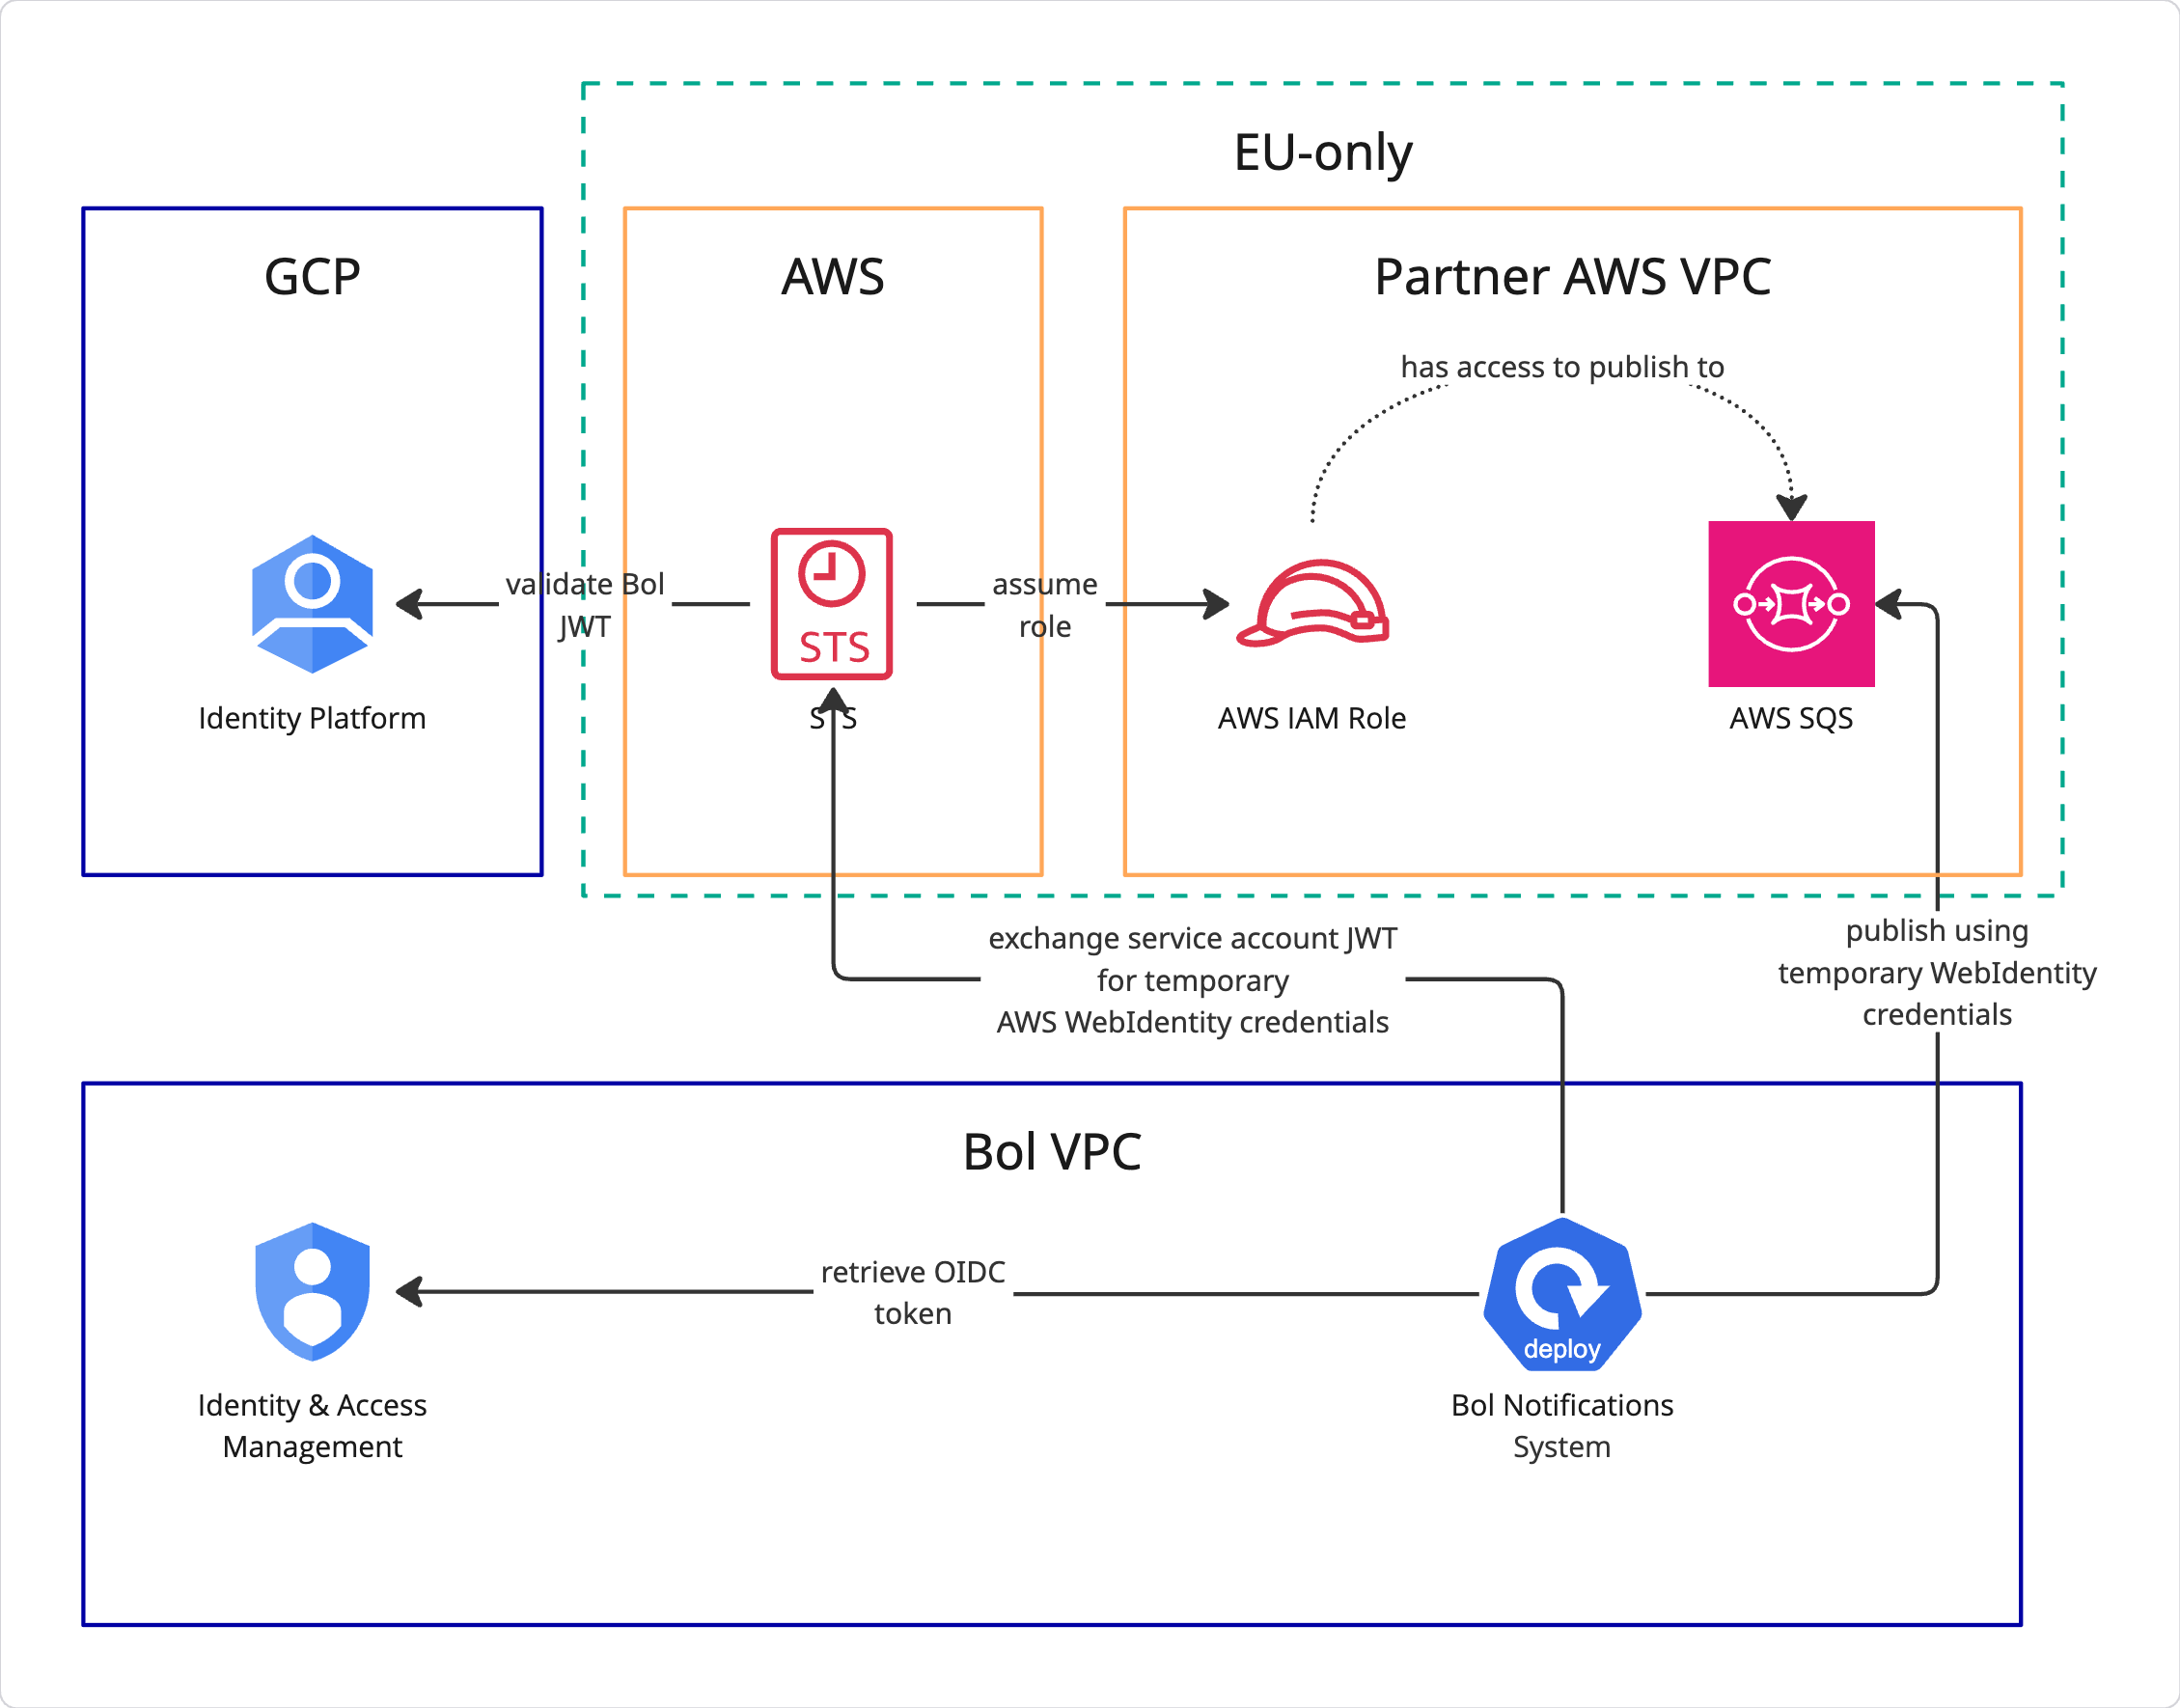
Follow these steps to start receiving event notifications on your AWS SQS topic:
-
First, you can configure a trusted Identity Provider (IdP). This is optional, as you can also input the federation target (
accounts.google.com) directly when creating the role in the next step.-
Navigate to
IAM→Access Management→Identity Providers -
Click
Add Provider -
Select
OpenID Connectas theProvider Type -
Input
https://accounts.google.comas theProvider URL -
Input
116790978013053194331as theAudience-
Note that these must be entered exactly as shown
-
-
-
Next, we’ll set up the IAM Role. This role will be assumed by Bol’s internal service in order to publish messages to your SQS queue.
-
Navigate to
IAM→Access Management→Roles -
Click on
Create Role -
In the
Trusted entity type, selectWeb identity. -
From the
Identity providerdropdown, either select the IdP you created in the previous step, or simply selectGoogle. -
If you selected
Google, enter116790978013053194331in theAudiencetext box. This refers to the unique ID of the GCP Service Account in use by Bol, that will be used to publish notifications. -
Click
Next. We’ll assign permissions later, but you can do it now if you already have a policy for the intended target SQS queue. -
Give the role a useful name and description.
-
Click
Finish. -
Navigate to the newly created role and note down its
ARN; you’ll need it in the next step.
-
-
Next, we’ll create the SQS queue.
-
Navigate to the
Simple Queue Service(SQS) -
Click
Create queueon the top right -
The options here are unique to your use case. The only option we recommend is that the
Maximum message sizebe set to at least 16KB. Our notifications (at the time of writing) should be no more than 1KB in size, but future changes may be introduced that could increase this size. You will of course be notified of any such change ahead of time. -
Scroll down to the
Access policysection.-
Under
Define who can send messages to the queue, selectOnly the specified AWS accounts, IAM users and rolesand enter the role’sARNfrom the previous step. -
Ensure that you assign the appropriate read permissions, as is applicable to your application(s).
-
-
Click
Create queue
-
You should now be ready to register an AWS SQS subscription. Head down to the creating a subscription section for more details.