Subscriptions
Introduction
Subscriptions allow consumers to subscribe to relevant events via push notification when they happen. This allows users to register webhooks and subscribe to events that they would like to receive.
Event types
We currently support the following webhook subscriptions:
Process status subscription
The PROCESS_STATUS subscription event informs you of the status of the process status which is returned in case of asynchronous communication with the Retailer API.
It has the following types:
| Event name | Description |
|---|---|
|
The request was successfully completed. |
|
The request failed. Examine the process status error message for more information. |
|
The request timed out. This means the downstream service was unable to process all the requests in a specified timeframe, and therefore we timed out your request. |
Here is an example of a push message you might receive after creating a process status subscription:
{
   "retailerId":1234567,
   "timestamp":"2020-02-02T23:23:23+01:00",
   "event":{
      "resource":"PROCESS_STATUS",
      "type":"SUCCESS",
      "resourceId":"1234567"
   }
}
The event.resourceId in this message is the processStatusId from the call.
Shipment subscription
The SHIPMENT subscription event allows you to monitor shipment status, and has the following type:
| Event name | Description |
|---|---|
|
A shipment has changed its shipment status. |
The resourceId in the message body is the shipmentId which you can use with the GET shipment by shipment id endpoint to see in detail what changed in the transport.transportEvents element.
Here is an example of a push message you might receive after creating an update transport event subscription:
{
   "retailerId":1234567,
   "timestamp":"2020-02-02T23:23:23+01:00",
   "event":{
      "resource":"SHIPMENT",
      "type":"UPDATE_TRANSPORT_EVENT",
      "resourceId":"0837872b-f805-45f3-8f60-3233ea933ed7"
   }
}
Requirements
For security reasons we only accept webhooks that are registered on an https domain. Registering a webhook without using SSL is therefore not possible and will result in an error when attempting to subscribe.
Connecting to Subscriptions
The following diagram describes the logical flow of connecting to the PROCESS_STATUS webhook:
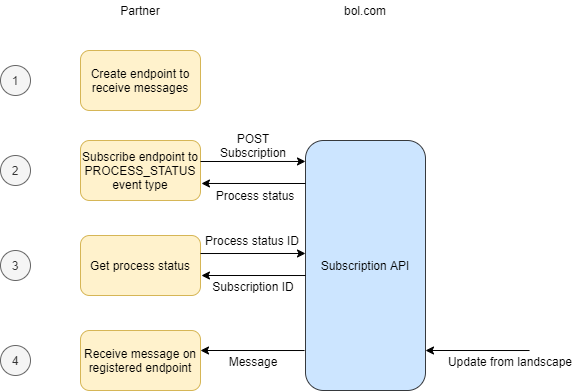
1. Create your webhook
First of all you have to build a webhook on your side where we can send the events that you want to subscribe to. As stated this must be an https address.
See 4. Receive events to learn what to expect, so you can build your endpoint accordingly.
2. Subscribe to event(s)
After you implemented your webhook successfully it’s time to subscribe your endpoint to the Subscription API.
See POST to learn how to create a subscription.
You could also choose to update your current subscription. See PUT to learn how to do this.
3. Get process status
Because the POST call in the previous step is asynchronous we return a process status object. From it you can retrieve its process status id and request the status of the process.
Once it is done the response will have an entity id which represents your subscription id.
4. Receive events
Once you have created your endpoint and subscribed to an event, you will start receiving messages.
The list of supported events are:
-
PROCESS_STATUS -
SHIPMENT
Shipment events will notify you if a transport event gets updated.
Of course, it is possible for messages to arrive in the wrong order or for a message to not be delivered due to timeouts or other issues at either side.
Request signing
Messages sent from bol through push notifications can be verified using digital signatures. This allows you to ensure that the messages were not tampered with through means such as man-in-the-middle attacks, and prevents abuses of your public endpoints by third parties flooding your endpoints with bad requests.
The "signature" header in webhook messages can be extracted to verify the origin and contents of the message. This signature is added by signing a request body with a public/private keyset. The private key is used by bol for creating the signature, while the public key is used by the partner for verification. You can use the public keys you retrieve from the bol API to verify the signature provided in requests to your public endpoints, after which you can commence with your transactions.
Signature header structure
The signature header sent to you looks like this:
Signature: keyId=0, algorithm="rsa-sha256", signature=<SIG>
The three elements in the signature are:
-
keyId- the ID for the keyset used to create the signature. We have built a method to create new keysets once the old ones become compromised through getting leaked or hacked. -
Algorithm- the algorithm used to create the signature. In our case we use a static value ofrsa-sha256. For more information see RSA-SHA256 signatures. -
Signature- the created signature that can be verified by the recipient of the message. The signature is sent as a Base64 encoded UTF-8 string. Depending on the library doing the verification, the signature might need to be Base64 decoded before it is validated.
Retrieving public keys from the Subscription API
The keys referenced in the signature are available from the Subscription API. The reference documentation can be seen here. Here is an example response from the Retailer API:
GET /retailer/subscriptions/signature-keys
{
    "signatureKeys": [{
        "id": "0",
        "type": "RSA",
        "publicKey":"PUBLICKEY"
    }]
}
This will return a list of public keys. You should cache these, as they will not change. If you do encounter a message signed with a new keyID not currently contained in your list, you can request the keys again to obtain the public key that is part of that keyset.
The contents of this response are:
-
id- the ID of the keyset with the referencekeyIdin the signature header. -
type- the type of key, in this case an RSA public key. -
publicKey- the Base64 encoded X.509 public key. To load it, first decode it from Base64 and then load it as an X.509-spec public key.
Validating the signature
The SHA256 algorithm calculates a unique hash of the input data, then encrypts the hash with the private key. To verify the authenticity of the message, you should:
-
Calculate a hash of the same data using the public key.
-
Decode the hash from Base64 using the public key and load it as an X.509-spec key.
-
Compare the hash values. If they match, the signature is considered valid. If they don’t match, it either means that a different key was used to sign it, or that the data has been altered.
The following code sample validates the signature of a request to use as a baseline for the implementation - you can adapt it to your programming language of choice. No additional libraries beyond the standard JVM are required:
String subscriptionKey = "PUBLIC_KEY_STRING_RETRIEVED_FROM_SUBSCRIPTION_ENDPOINT";
// Retrieve the key from merchant, decode it with the Base64 decoder.
byte[] encodedKey = Base64.getDecoder().decode(subscriptionKey.getBytes(StandardCharsets.UTF_8));
// Load the public key, use the SHA256withRSA instance and load it as an X509KeySpec
PublicKey publicKey = KeyFactory.getInstance("SHA256withRSA").generatePublic(new X509EncodedKeySpec(encodedKey));

// Given the following extracted signature from the request header
String signature = "SIGNATURE_FROM_PUSH_NOTIFICATION_HEADER";
// And the message body sent to the push notification endpoint
String body = "Message body";
// Decode the signature and convert it to a byte array
byte[] signatureBytes = Base64.getDecoder().decode(signature.getBytes(StandardCharsets.UTF_8));
// Verify the signature using the public key created earlier
final Signature sha256RsaSignature = Signature.getInstance("SHA256withRSA");
// Initialize the signature with the publickey
sha256RsaSignature.initVerify(publicKey);
// Add the bytes string conversion of the signature header
sha256RsaSignature.update(signatureBytes);
// Verify the signature, this function will return true for valid signatures
boolean result = sha256RsaSignature.verify(body.getBytes(StandardCharsets.UTF_8));
Subscription Service Features
At-least-once delivery
To make this as reliable as possible we’re making use of at-least-once message delivery. This means that it’s possible to receive the same message multiple times. Please make sure that your system can handle this, for example by registering which messages you’ve already processed on your side.
Retry mechanism
If we cannot deliver a message the first time, we will retry 4 times with an increasing accumulated interval between the retries.
| Retry | Interval |
|---|---|
1 |
1 min |
2 |
2 min |
3 |
4 min |
4 |
8 min |
|
After these retries we will not try again and the message will be dropped. As a fallback scenario you can always use the respective GET endpoints on the Retailer API. |
Possible race conditions
We cannot guarantee messages will always arrive in the correct order.
For example: Message A and B for the same process have failed, where the retries of message A have failed 2 times and the retry of message B failed once.
Let’s say your system comes up in the meantime and message B is retried after 2 minutes while message A will be sent after 4.
To enable you to check if this is the case we added a timestamp to the message.
| This is the timestamp of the event being handled in our landscape, not the timestamp of when we sent it. |
Supported operations
Create subscription
To create a subscription you have to do the following call: POST /retailer/subscriptions
{
  "resources": ["PROCESS_STATUS"],
  "url": "https://www.bol.com/webhook"
}
This will return a response with a process status, as you are used to from our other API calls. Once it’s successfully processed you can get the subscription id (entityId in the process status response) with which you can do the following operations.
| a URL can only have one subscription. If you want to subscribe to multiple resources for one URL you have to manage this with one subscription. You can’t have more than one subscription for the same URL. |
Get subscription by id
This endpoint enables you to fetch a subscription by its subscription id and verify its details.
{
  "id": 1234,
  "resources": ["PROCESS_STATUS"],
  "url": "https://www.bol.com/webhook"
}
Update subscription
This endpoint enables you to modify an existing subscription by its subscription id. For example you can use this to change the address of your endpoint or the event types that to want to subscribe to.
The body looks the same as the POST call except you have to include the id.
-
When you want to remove a resource from the subscription, you have to submit the resources you want to subscribe to, excluding the one you want to remove.
-
When you want to add a resource, you have to submit all the resources you want to subscribe to, including the one you want to add.
Remove subscription
This endpoint enables you to entirely delete an existing subscription by subscription id.
|
For the specific API documentation, please visit our ReDoc page. |
IP Whitelisting
These are the public IP addresses from which we publish messages that you can whitelist if needed. Although this list is static, it is not guaranteed that these IP addresses remain the same over time. IP addresses can either be removed or added to this list.
35.204.245.136
35.204.195.116
35.204.156.102
35.204.83.251
35.204.231.62
34.90.203.104
34.90.109.47
34.91.34.58
34.91.134.228
34.91.91.54
Test subscription
You can use POST test push notifications to test your subscriptions using your subscription ID. If there is a subscription for that retailer, a response message will be sent to the corresponding hook/URL.